Solar Dehydrator: Better to do it badly than read about it!
Well, this was one tough SoB of a project for me.
Let me be clear on this, so there wouldn't be any misunderstandings later in this post:
Most of the time I had absolutely no idea what I was doing.
While doing it, I was faintly recalling some of the solar dehydrator projects I found online while surfing the Internet, but followed none of their instructions in detail because I felt at the time that it would be more fun to do stuff badly than to read stuff correctly.
Seriously, there is a load of opinions and verbal arguments today, but rarely some real work.
Luckily, I had this
detailed specification/ white paper of the project, which helped me through the dehydrator building process:
 |
| Solar dehydrator official white paper |
We shall call this specification a "white paper" from now on. While constantly referring to the white paper, there was no room for error. There were of course some ambiguities on some of the white paper details, but they were easily bypassed by a complete lack of concentration and a complete abundance of alcohol on the project location.
Chapter 1
Solar Dehydrator Project: Absorber main building blocks
Or, alternative heading (more precise):
Chapter 1: Beer Drinking
Let me introduce you to some of the main characters in this dehydrator chapter:
 |
| My personal favorite beer brand: BEER. You can find them at Lidl for a cheap price. Tastes like beer. Can't really get you drunk (3% alcohol), unless you really commit yourself to the cause |
 |
| This one was truly horrible. Ožujsko. Beer/juice mix. I almost gave up on the dehydrator idea because of this crap. |
 |
| This one is strangely similar to the BEER from the first picture. Berg König. This species live in Hofer supermarket chains. Also tastes like beer. Also 3% alcohol. |
 |
| Pils, whatever. Don't remember where this one came from. Tastes like beer. |
 |
| Berg König, but with larger % of alcohol content. Tastes like beer. |
 |
| Bavaria, overpriced and everexposed beverage which tastes like beer. |
 |
| One of the best buys, Löwenbräu, in can-nish person. |
Eventually I got bored with taking photos of the beer cans, so let's move on.
Chapter 2: Preparing the Cans
After several days of hard work which consisted of collecting enough beer cans for the absorber (about 70), the cans needed some processing before putting them together. We had accidently exceeded the needed number of emtpy cans (for about a double), so if anyone would like to make their own absorber in this fashion, I would be happy do donate raw material. Also, if anyone should need help with preparing the cans (e.g., making them empty), I would also be happy to stand in the front line of volunteers.
 |
| Removing the can bottoms using the cordless screwdriver and a crown drill bit. It was a bitch of a job. |
 |
| Scissoring the upper part of the cans. It was a bitch of a job. Both for me and for my garden scissors. |
 |
| The idea was to make something like flaps, to cause turbulence of the passing air (because of the physics and stuff) |
Because the air, which would one day dry the food, which we will eat, will be passing through the cans, I figured that
the best way to get the cans sanitized was to throw them inside a dishwashing machine and start a cleaning cycle.
 |
| Sanitizing the cans in a dishwasher |
Chapter 3: The Gluing
After the cans were clean and dry, the time has come to glue them together. I used some high temperature-resistant silicone (high temperature sealant) for this job. It was black in color, and smelled awful.
How did I decide to buy exactly this stuff? Well, I went to the paints & lacquers store, and the conversation went something like this:
Me: Good Day!
Seller: Good Day Indeed, Good Sire! How could I be of a fair assistance to you?
Me: Well, I am working on a solar dehydrator project. I drank a lot of beers. Now I need to glue the cans together.
Seller: ... ?
Me: I need some glue or something to glue the hollow beer cans together.
Seller: Erm... ?
Me: Gluing. Glue. Glue stuff. Together. I read on the Internet that it needs to be temperature-resistent.
Seller: What were you saying you are working on?
Me: Please give me some high temperature-resistant silicone (high temperature sealant).
Seller: There you go.
Me: Thank you.
Before actual gluing, or before even knowing how many cans I need, I needed to take some measurements. The recycled window unit was the basis for all that came after.
Unfortunately, I forgot to mention that fact until this very point of writing the post. So, here we are, at the very start:
 |
| One of these old windows was the starting point of the project. I "bought" these for a few $$, because the person from whom I acquired them was just trying to get rid of them. |
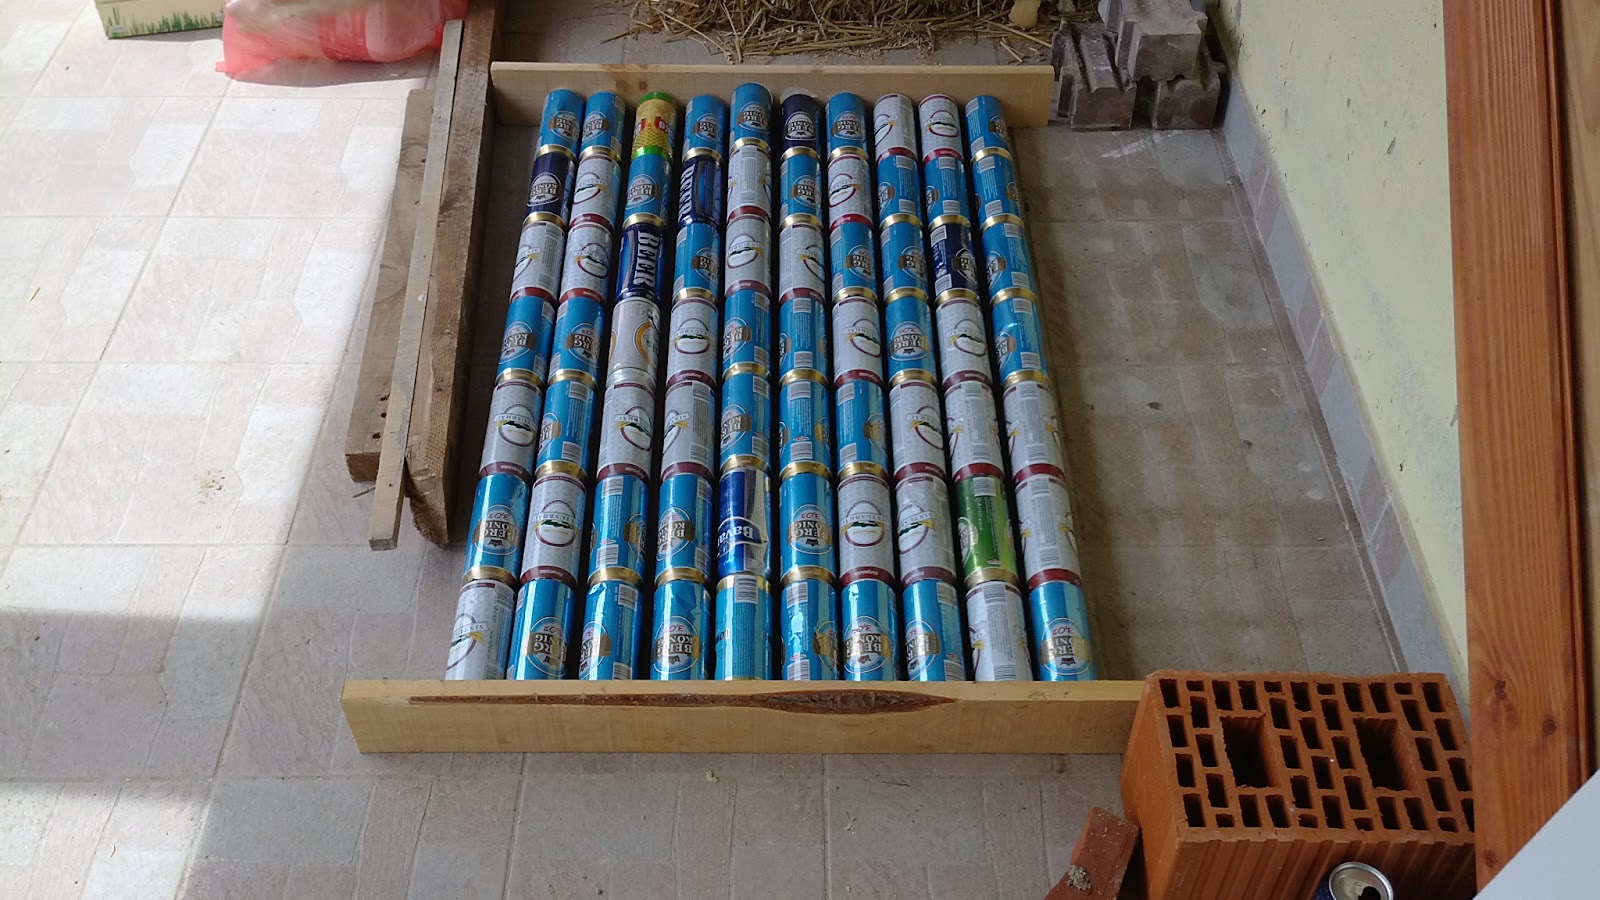
I figured I would need 10 columns and 7 rows of cans to cover most of the window glass. That brought the previously mentioned numbers, 70, the right number of cans for the absorber, and 140, the overkilled number of beers.
 |
| Gluing the cans together |
So, back on the track. Gluing was easy, and even fun thing to do.
The sealant worked great because the cans were perfect ass-to-mouth fit. Heh, I did not expect this comparison. The problem was to hold 7 glued cans together in a straight line until the sealant dries. The first attempt to accomplish this took grounds in some web articles about gluing cans, but it failed in my efforts.
 |
| Making a temporary can holder like seen on the web. It was a waste of time: too small, to slow (one holder for one batch of cans), to unstable, too shitty. |
Then it hit me:
I had a wall! Even several of them, mind you. And walls are (relatively) straight. All I needed was some kind of mass to hold the cans pressed to the (relatively) straight wall lines, and to each other.
 |
| Engineering at its best: Pressing the cans together and against the wall until the glue-sealant dries. |
When all of the cans were neatly put together, I was searching for a screwdriver. When I accidently bumped the table it was sitting on, some giant iron bar, which was also sitting on the table, minding its business, flew in the air and went straight in the direction of glued cans, which were also minding their own business.
I calmly watched as the iron bar went down on one of the cans, neatly puncturing it and causing the can to crumple.
I was cursing for the rest of the day.
 |
| One of the things you don't expect when doing stuff: Flying iron bar comes out of nowhere and punctures one of your cans. |
 |
| Preparing the sides for air intake and air exhaust. |
 |
| I found about the right-sized drill crown bit after drilling some holes with the wrong-sized crown bit. |
 |
| Testing the fit of the air intake holes with the cans. Because I wasn't terribly interested in too much measurings, it was more of a "hoping for the best". |
 |
| Reasonably idiotic way to glue the cans with the wooden planks and sealing the rifts. I was using the same high temperature-resistant silicone as for gluing the cans together. |
 |
| There we go, cans glued together, cans glued to wooden planks together. What was wrong with this idea? Well, the Earth was revolving around itself at the moment, and that made this construction fairly unstable. |
Chapter 5: The Matte Black
Apparently the Sun's favorite color is black, and when you give the Sun black as the sacrificial Gift, the Sun responds with a lot of radiating heat. And THAT is the basic science behind the solar absorber.
 |
| The most fun part of the process: Painting the cans to matte black with temperature-resistant spray color (about 5$ per can, and one should suffice unless you got carried away and paint some other non-matte-black stuff into matte-black stuff). |
 |
| You remember when I said that one can of matte black temperature-resistant spray would suffice unless you got carried away and paint some other non-matte-black stuff into matte-black stuff? Well, ... |
Chapter 6: Preparing the absorber frame
As you have perhaps already noticed, this particular building process is anything but natural or intuitive. For reasons not so clear to me now that I recall it, I have decided to build the frame around the window unit, instead around the back panel. So the whole engineering looks a little backwards. Which later proved it was a stupid thing to do. Nevertheless, I am sure I had some pretty good argumentation when I originally decided to do it in this manner.
 |
| Preparing the absorber frame: out-of.-the-ass planning and construction at its best. |
 |
| With the right bits, screw-driving with a cordless driver is a pleasing equivalent to munching a tasty cheeseburger with an excess quantity of balanced sauce |
 |
| The exact amount of screws and their distance? According to the ignoring of construction rules, codes and guidelines, the general rule is: Here and there. |
 |
| Completed absorber frame. The bottom part in this picture is the bottom part of the frame - I elevated it about 30cm from the floor because of the air intake. Upper cross-plank in the picture is only temporary, so feel free to ignore it. |
Chapter 7: The Insulated Absorber Back
The idea is to keep the heat inside the absorber, so it is more effectively transferred to the air inside the cans. The front of the absorber is insulated with 2-layered window glass. Building the back panel is presented here.
I was using the fiberboard panel cut to the desired size (cost about 5$), framed with some ~ 3cm x 3cm wooden boards I found laying around.
For the insulation I was using 3cm thick stone (mineral wool). Well, for the most of it anyway. Details are in the pictures.
 |
| Setup of the back panel; cutting the stone/mineral wool. Behind the wool you can see the fiberboard panel. Because fiberboards are fairly floppy by their nature, the panel is framed with 3cm wooden board for stability |
 |
| Ahhh, the nice fit. Nice fits feel great. |
 |
| I have encased the wool in the kitchen aluminium foil. Because it looks more cool that way. |
 |
| ... and because the wool is fairly irritating to skin. And because of the possible light reflection back to the black cans. |
 |
| Ahhh the nice fit #2. |
 |
| Did I mention that I wasn't really in a mood for precise measurings? Well, maybe I should have been... |
 |
| Almost done! Not much more wool is needed, I will certainly have enough to... |
 |
...aaaand,
shit. |
 |
| Styrofoam comes to rescue. |
 |
| Trying to make one piece of insulation out of many pieces. It fell apart several times, naturally, before it looked like in the next picture. |
 |
| There, done. |
Chapter 8: Putting it all together and realizing I have my first DIY solar air collector
So, by some cosmic miracle I've managed in a completely unorganized and half-assed fashion to create three layers of the solar collector:
1) The absorber
2) The front glazing
3) The back panel
And now, something completely the same: half-assed way of putting all those parts together.
Hint: bunch of screws and screwdriver battery capacity.
 |
| Putting the absorber frame into the window frame |
 |
| Putting the insulated back panel onto "Putting the absorber frame into the window frame". Actually (and I hate the word "actually"), it does not make any sense to put the back panel in the last stage of the construction. It is not even fun thing to do it that way. It is just plainly, completely, utterly stupid way to do it. But there you go. |
Here we have a fancy 3D model of what have I done so far.
If you would like me to send you the original SketchUp 3D .skb file with exact measures, you would have to motivate me first in some subtle way.
 |
| All the layers of the solar air collector in a nutshell |
In the next post, I will present the mainly shitty work I've done with the dehydrator chamber, and the reasonably solid work I've done with the collector support. On
wheels!
 |
| As I've previously remarked, we had slightly miscalculated the needed number of beer cans. |


Great post really appreciate the you showing your mistakes as well as success in among this dehydrator
ReplyDelete